Friday, September 28, 2012

"Team" Earring Tutorial

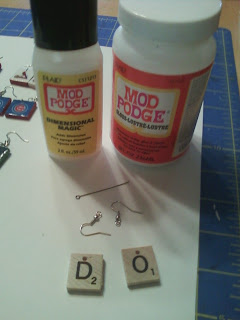
Supplies:  See Pics below supplies.  Most of it is pictured.
1. Scrabble Pieces.  You can purchase at Michaels.
2.  Images of your choice.  I bought mine off of Etsy under scrabble images.
3.  Small Jewelery rings.
4. Earring Hooks.  Again from Michaels.
5.  Paint color of choice
6.  Modge Podge
7.  Dementional Modge Podge
8.  Drill
9.  Also not sure what it is called but used the wire bead filler.  That is the thing in the picture that looks like a needle with the circle at the end.  LOL!  In the jewelery dept. at Joann fabric.

How To Make:
1.  Drill hole in top center of 2 scrabble pieces.
2.  Use your scrabble piece to trace around the image you are using or use the scrabble size image if already sized. (CUT OUT)
3.  Paint your scrabble pieces to match the image you chose.  Front back and sides.
4.  Once paint dry, now Modge Podge your image on the side with the letter of scrabble piece.
5.  Once Modge Podge is dry then you will use your dementional Modge Podge and put a layer on your image.
6.  Once Dementional Modge Podge is completely dry now take a pin and poke from the back to make sure you do not seal the hole.
7.  Now Dementional Modge Podge the backside.  Let Dry Complete.
8.  Now once all dry you can take the thing I call a bead filler and put halfway through hole of scrabble piece and bring both sides up and twist.  Cut accessive wire off, but you will be using the round end to put the ring through which will also have the hood earring.  Or you can just use a ring to up through the scrabble hole.  What ever is easier for you.  Sorry I cannot remember what those are called.  If you are reading this and know, please feel free to comment!  LOL!
And now you are all finished and have some really cute earrings!!!!
Thanks for visiting my blog and hope you enjoyed this tutorial!


Tuesday, September 18, 2012

"Mickey Mouse" Tooth Fairy Pocket Pillow Tutorial

 
Tools Need:
1. 2 pieces of fabric of choice approx. 4.5 by 4.5.
2. Black & Red Felt (Not Shown)
3.  2 white buttons
4. Needle & Thread (Not Shown)
5. Ribbon of choice
6. Pillow Stuffing
7.  Hot Glue Gun...(Not Shown)
8.  Sewing Machine (Not Shown)
9. Pen & Cardboard or Paper

How to Make:
1.  First cut 2 pieces of fabric of choice the same size. (Approx. 4.5 X 4.5)
2.  Cut a piece of ribbon of color choice. (Approx. 10 inches)
3.  Take your Pen and a piece of paper/cardboard and make a Mickey shaped head using a glass and 2 milk carten lids for the ears...  Then cut it out so you have a Mickey head Pattern.
4.  Pin your Mickey head Pattern on the black felt and cut around, so you have a full Mickey head in Black felt.
5. Next Pin your Mickey head again on the Read felt and cut around to for the Mickey head.  Now take the Red Mickey and cut in half so you just have half the large circle for his pants.
6.  Now place the red pants on the bottom half of Mickey head made from black felt.  Now take your sewing machine or hand stitch around the bottom of the pants leaving the top of pants to make the pocket.
7.  Now hand sew the 2 white buttons on the red pants.
8.  I also sewed "MY TOOTH" on mickey with my sewing machine.
(Not Necessary)
9.  Now set aside Mickey for now and take your 2 pieces of 4.5 fabric and 10 inch ribbon.  Take one piece of the fabric laying down with design facing up.  Now pin Ribbon as shown below and then lay other piece of fabric over design down as shown.


10.  Now sew around the edges leaving the bottom open for sewing with your machine.
11.  Now once sewn pull inside out and pull your pins out of ribbon.
12.  Now stuff with stuffing leaving a half inch at bottome to sew across.
13.  Take scissors and trim off any accessive fabric.
14.  Now take your glue gun and glue Mickey on the from of pillow.
 
And you have you Awesome cute Mickey Mouse Tooth Fairy Pocket Pillow!
 
Thanks for Stopping at my blog!  Hope you enjoyed & stop back again!!! 


Wednesday, September 12, 2012

D.I.Y Decorated Team Wine Glass Tutorial!

Tools Needed:
1. Wine Glass or Martini Glass.. You can get nice one's at the Dollar Store.
2.  Sharpie Paint Pens... Your color choice depending on what team you are doing.
3.  Oven
 
How to:
1.  Wash and Clean your glass very good before applying paint.
2.  I covered the bottom of the glass with my White Paint Pen and then used my Red Paint Pen to add the seams like a Baseball.
3.  The Stem you just scribble with the Paint Pen colors because it kind of looks 3D so you really cannot make any mistakes when painting stem...
4.  Next Decide what Team Logo you are going to do.  I practiced with a Pen on paper first before I applied the Paint pen to my glass.  But do not worry, if you do make a error on the glass you can wipe off as soon as possible before drys perminent.
5.  Once complete, I would let glass sit for 24 hours to completely Dry.
6.  Next do not preheat, but just put glass on cookie sheet standing up at 250 degrees for 30 minutes...  Then take out and cool....
7.  Glasses should be hand washed only!!!!!!!!!!!
 
I am making these this year for X-Mas Gifts!!!!  You can obviously put any design your heart desires on them!!!!!  I just have a lot of Wine drinking St. Louis Card Fans!!!  LOL!! 
Thanks for visiting!!!


Saturday, September 1, 2012

Mickey Mouse Party Bag Favor Tutorial!

THE 5 MIN. T-SHIRT TUTORIAL IS BELOW THIS MICKEY TUTORIAL!


TOOL YOU WILL NEED:
1. I BOUGHT THESE CUTE LITTLE GREY FELT CONTAINERS FROM TARGET IN THE $1 SECTION.  YOU CAN ALSO PROB. FIND AT $1 STORE....
2. BLACK & RED FELT WHICH I GOT AT JOANN FABRIC'S.
3. YELLOW BUTTON AGAIN JOANN FABRIC.
3. A PIECE OF HEAVY PAPER, MAYBE CARDBOARD.
4. BLACK SHARPIE
5.  SEWING MACHINE/ NEEDLE THREAD
6. HOT GLUE GUN


HOW TO MAKE:
1.  I FIRST TOOK MY HEAVY PAPER AND DREW MY OWN MICKEY HEAD DESIGN AND MICKEY GLOVE DESIGN & THEN CUT OUT.
2.  NEXT USE YOUR DESIGN AND PLACE ON FELT AND CUT YOUR MICKEY HEADS AND GLOVES OUT.  AS MANY AS YOU PLAN ON MAKING....FOR THE GLOVE I DID IT IN WHITE AND  USED THE SAME PATTERN AND CUT A LITTLE LARGER GLOVE IN BLACK TO PLACE BEHIND THE WHITE.
3.  NEXT I USED THE MICKEY HEAD ON RED FABRIC TO MAKE THE HALF HEAD FOR THE PANTS.  SO JUST GO HALF AROUND AND CUT STRAIGHT ACROSS.  SEE PICTURE....
4.  NEXT I USED MY SEWN MACHINE TO SEW THE RED PANTS ON THE BLACK MICKEY HEAD.
5.  I THEN HAND SEWN THE YELLOW BUTTONS ON.
6.  FOR THE GLOVE I TOOK MY SEWN MACHINE TO SEW THE NAMES ON THE GLOVES.  I USED A BLACK MARKER TO DRAW THE LINES FOR THE GLOVE.
7.  NEXT I HOT GLUE THE WHITE GLOVE ON TOP OF BLACK GLOVE, THEN I HOT GLUE THE MICKEY ON ONE SIDE OF FELT BASKET AND THE GLOVE ON THE OTHER...

AND FINISHED!


THANKS FOR CHECKING MY BLOG OUT!

My son's homemade Mickey Mouse Cake!


Tuesday, August 28, 2012

5 Min. T-shirt Scarf Tutorial

Grab a old T-shirt or Tank Top
Cut across at Armpit
Now cut slit's half way up the biggest half of T'shirt & you will pull on each one to stretch them out....
This is what it will look like when done cutting and stretching
Sorry does not look that great with this sweatshirt, but my 6 year old took the picture and was a little impatient for me to change!  LOL!  This is what the ending result will look like!!  Super cute with solid top or tank!  Also you could prob. Trim the little tassels if needed and if you use a tank top it will hang shorter as well..  I made one that way as too....This project is fun and only took 5 min. if that!!!  Great Gift for someone!


Wednesday, August 15, 2012

Real Baseball Keychain Tutorial

Tools you will Need:
1. Real Baseball
2. Hole Puncher
3.  Keychain Ring with hook bottom (Bought at Joann Fabric)
4. Hot Glue Gun
5. Button (I used a Red Button)
6. Team Logo (ordered off Etsy.com)
7. Modge Podge & Dementional Modge Podge
8. Box Cutter
9.Scissors
10. Needle & Thread

How to make:
1.  First take your Baseball and Box cutter and cut around the middle of the seams all around the base ball.... You may have to do a couple of times to cut deep enough into baseball.
2.  Next start peeling the 2 pieces of the base ball back.. You should be able to make 2 from one base ball.  To loosen it up even more if needed take your scissors and cut along the seams where you were cutting with the box cutter.
3.  Once you have peeled away from the baseball you will now pull any accessive seams away from the ball.
4.  Now take your your button, Trace your logo for size of logo to fit on button.  Put logo aside and now  place button where you want and use your needle and thread to sew on.
5.  Now modge podge your logo on the button and use your dementional modge pod to glaze the logo.  Now let dry completely....
6.  Once completely dry fold your pealed baseball in half and use your hole puncher to make hole for the hooked key ring....
7.  Once hole is completed, now take your glue gun and glue the pealed balled together foled in half...
8. Now stick your hooked key ring in...

Now you have a awesome Team Baseball Keychain!!!!


Tuesday, July 31, 2012

Team Colored Beaded Wire Wrap Bracelet Tutorial!

More Colors and Examples at the bottom of tutorial!!! 
Tools you will need:
1. Beads, Beads, Beads!  You have to use a mixture of light weight beads as well as heavy beads, such as glass beads... Most of the little ones you see in the pic. are small plastic colored ones.  Also I have my baseball and football beads you can buy from Hobby Lobby or Joann Fabrics...  This one in the pic is made to represent U of Iowa.... 
2.  Wire 20 guage.... You can use any color.. I used Silver....
3. Scissors

How to make:
1.  First take one end of your wire and pull like a slinky....
2.  Figure out how many rows you want your bracelet to be..  I usually go Four...  So once you figure that out keep it in slinky mode and cut to the size you want...  Do not worry about fit just yet, because this will fit all wrist.  Because it is a wrap bracelet and you can form the wire to fit your wrist when all done...
3.  Once you have your size cut, you will take one end of the bracelet and make a small loop... This will be the stopper as you put the beads on..
4.  Now you will start sliding your bead on from the unlooped side in any order you like...  I do about 5 light plastic beads and then a heavier glass bead(Baseball or Football)..  Does not have to be a sport... You can just make a cool bracelet.  Leave a real tiny space at the end to make another loop. 
5.  Once all your beads are on you will leave enough room to make another loop on the other side to hold beads in.  The loop should be enough to make sure all beads are tight and no sliding...
How Easy was that!  Now you have a Really cool looking wrap bracelet!  Here are some other one's I did!
Chicago Bears
St. Louis Cards..
Colorado Rockies
Packers


Thursday, July 26, 2012

Real Baseball Cuff Bracelet Tutorial!

Real Baseball Cuff Bracelet!


Tools you will need:
1. Baseball- Bought a 2 pk from Target
2. Box cutter
3. Images from Etsy.com
4. Mod Podge & Dementional Mod Podge
5. Baseball bead Joann fabrics
6.  Elastic band...  Joann fabric
7. Needle & thread
8.  Sewing machine
9. Piece of fabric of choice to put in the inner piece of baseball.. Not shown in pic.
10. Sewing machine  Not shown in pic
11.  Beads/ Optional
12. Glue Gun  Not shown....

How to:
1.  First take your baseball and you are going to want to cut the pattern around the seams.  Once you have taken your cutter around the shape a few times it will peal right off!  Super easy.  Did not take long at all. 
2.  Now that you have your Baseball cuff, you decide how you want to decorate.  As you can see in the pic.  I did a plain one with just the Cardinals logo and did a Cubs beaded one. 
3.  For the beaded one you take your needle and thread and the tiny little holes where the seams are on the baseball you will go in and out adding the bead through the holes!  Super easy!!!!
4.  For the logo, cut your logo out and mod podge it on where you want it and then once dry put your dementional modge podge on and let dry over night.  I cuffed mine around a bottled water  to hold the cuff while applying this and letting dry!
5.  The longest part is taking some material of choice and outlining the baseball cuff.  You need 2 pieces the same.  Now you will take and sew inside out like you would a pillow.  Make sure you put the elastic bands in on both sides before you sew.  The one side will be the band folded in half and the other will go through the hole of the baseball bead and then folded in half.  I actually used my needle and thread to to sew them like a cursive small case "L" then I pinned them on each side of the fabric before sewing together. Look below at pic... Once sewn you will reverse right side out, finish sewing.  now line up on the inside of baseball cuff and once lined up you will hot glue the fabric in. 


6.  Once completely dry you should be able to loop the one side of elastic around the ball to close....
7.  Be sure to look at pic closely to get a better idea of backside!!!
Now once done you have this Awesome Team Bracelet.. Remember you can decorate anyway you like!!!
Hope you enjoyed this Tutorial!!! 
On this one I cut the ball between the seam which let's you make 2 bracelets out of one ball..  Pull the seams out and you can take thread and sew around again to look like seams with the holes that are already made!! 

Teacher Bracelet with sewn in Name....